Posts

Showing posts from September, 2009

Now With 100% Less Whining

Image
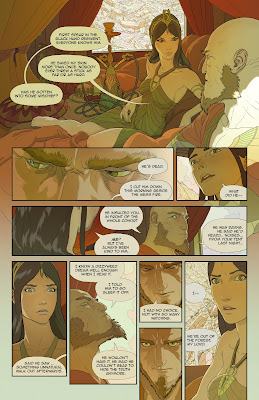
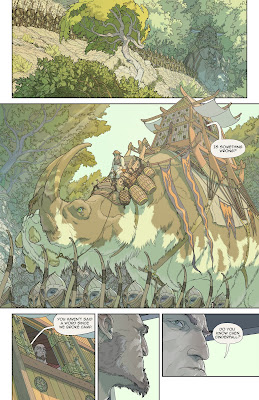
Page 4 first-pass color complete. Click to enlarge. More below. Here's why I love the internet: a month ago, I didn't know the word "flatting." Three weeks ago, I didn't know there were flatting plugins. Two weeks ago, it took me fifteen hours to flat a page using those plugins. This week, it took three hours. All because of comments on this blog. Holy shnikeys. I ended up trying Eagle's method -- that is, removing extraneous lines from the line art layer before running the plugins. Below are examples of the line art for this page in pre- and post-culled states. Note that in many cases all I had to do was make a "leak" in between two areas so that they filled with the same color. And here's what the plugins spat out. The second image is cleaner and more tractable. All it needs is a few dinks with the magic wand, and I'm on my way. By the way, I still used the high-noise version at left to add some nice random variation to large single-color a

Problem Solving

Image
Page 7 line art done. Click to enlarge. More chit-chat below the image. Aintitcool recently posted a great conversation with Steve Lieber, the artist who drew " Whiteout ." He shared a heap of good information about craft and process, but I was especially interested in the description of his emotional travails: "I was ... less-than-pleasant to my wife at times, because I was just inside the pages and couldn't see past the battle I was fighting with each one. I think I let being concerned about how the book was going to turn out turn me into someone who was less concerned about how everything else in my life was going to turn out ... I was a damned troll under a bridge. [laughs] I was just really unpleasant. I was solving new problems, and rather than feeling satisfied that I was solving new problems, I was getting angry because everything wasn't coming out perfect the first time I put a line down." I haven't quite gone to Troll Town, but I do see s

Flattened Earth Society

Image
First pass on page 3 color. Click to enlarge. Below, I will try to keep things brief and I will fail. I finally downloaded the Flatten and Multifill Photoshop plugins . Survey says... not a magic bullet, but they probably sped things up a little bit and definitely produced cleaner, more line-conformant results. In case you're curious, here's how they work: The plugins are easy to install -- just drag the files into Photoshop's plugins directory and they'll show up under "Filters." There's only one tricky step - the black and white line art (not black on transparent, mind you) must be completely de-anti-aliased (re-aliased?) before the plugin will work. It turns out that this is done by selecting Image->Adjustments->Threshold. Bump the slider a bit to the right until all your lines connect, and then run Multifill. Multifill automatically fills every closed area in the drawing with a unique color. Next comes Flatten, which removes all the black lines f

Nurpling

Image
Page six. Click to enlarge. More rambling below the image. As you're drawing the eight thousandth leaf in a drawing like this, you start to ask yourself what exactly it is that all this detail really gets you. The costs are obvious - the drawing goes more slowly, your wrist hurts, the legibility of the image can even suffer. So why do it? For one, meaningful detail helps to model form. If you've decided on a "clean" look (and I'm not sure why I decided that, but whatever), you can't fall back on crosshatching or shading to indicate surface contours. Adding detail is a way of showing the lie of a surface. For example, I drew all the seams on the girl's costume. It's not because I have a fondness for seams. It's that, drawn correctly, the seams turn your figure into a wire frame model . The same goes for belts, straps, buckles, shoelaces, and buttons. There are pitfalls -- if you go too dense, you can lose the silhouette. If you draw even the tiniest