Paths of Glory
Word balloons seem so simple in the beginning. The first time you make one in Photoshop, you just draw an oval with the Elliptical Marquee Tool. After a while, the symmetry starts to bug you, so you decide to draw your word balloons by hand with the Brush Tool. Really, really slowly. But they still look kinda crappy. Before long, word balloons have become a source of sadness in your life.
Well, there's a third path. That path is Paths.
Why are paths so good for word balloons? Three reasons. First, you get super-clean, super-even lines. Second, you can modify them (if you change the words -- which you will -- it's no big deal to modify the dimensions of an already-placed balloon). Third, they're reusable. You can save all your paths into a single file and use them in future pages.
Here's how you do it (more accurately, here's how I do it, and I probably do it oddly, so please feel free to offer your own techniques in the comments section):
First, let's make a path that's shaped like a word balloon. Start by selecting the Pen Tool. The icon looks like a little pen nib.
The Pen Tool makes points, then connects them to other points to create paths. It's important to note that a path is not actually part of the image -- it's sort of a mathematical template that lives in the world of Paths. Think of Pathland as a parallel universe, full of ideal Platonic forms that can be scaled to any size and then copied into the static, pixelated world of Layerland.
To make a path with the pen tool, just left-click and drag. When you drag, you'll see little handles sprout from the point you've just made (if you don't drag, you'll just get a point without handles). These handles allow you to bend the paths between points. When you click and drag your second point, you'll see a path connecting the two points. Each new point you place will extend your path. Right out of the gate, you can make a rough word balloon shape -- don't worry about how funky it looks right now. We'll fix all that in a second. When you finally return to your starting point, your path is complete!

fig. 1: Starting Out
Now we want to adjust our points and handles. To do this, choose the Path Selection Tool. Now left click on an existing point to select it. You may find that all of the points in your path have been selected at once -- just hold down ctrl and click your point again to select only that point (ctrl toggles the Path Selection Tool between point mode and path mode). Now click and drag the little handles to see how they change the shape of your balloon. Also, if you want to either add or remove points from your path, click on your path with the Pen Tool (my biggest problem early on was a tendency to start out with too many points -- the fewer you use, the smoother your path will be).
Note how moving one handle automatically moves its opposite counterpart, like a see-saw. You want this for smooth curves, but for the sharper turns, you need to be able to move the handles independently of one another. To do this, hold down the alt key while dragging on a handle. Now that handle's free as a bird! Do this to get the sharp angles around the word balloon's tail (is "tail" the accepted term for the pointy bit? Maybe "beak" is better).
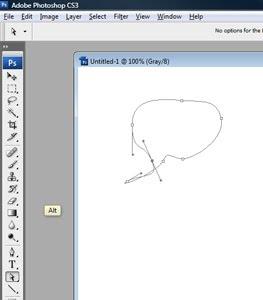
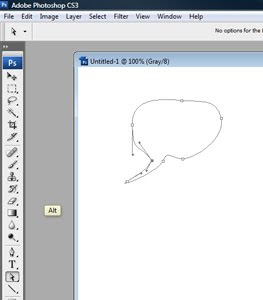
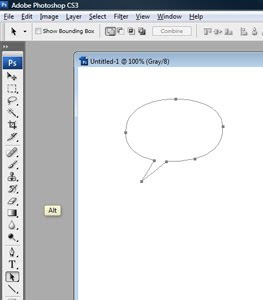
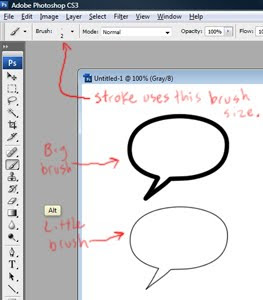
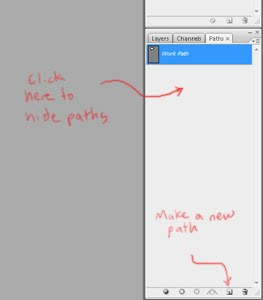
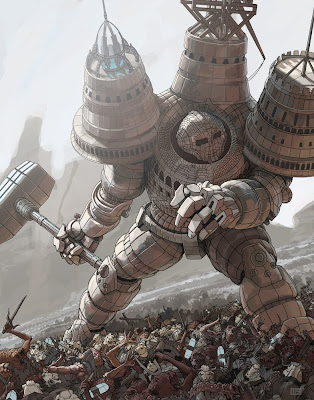

fig. 2A: The See-Saw

fig. 2B: Free as a Bird!
Fiddle with the handles a bit, and you should end up with something like this:

fig. 3: A Completed Path
Once you've gotten things adjusted the way you want, you're ready to stamp your shape into Layerland. With the Path Selection Tool selected, right-click your path. Choose Stroke Subpath, and WHAMMO! You've got yourself a word balloon! When you stroke a path, Photoshop applies whatever brush size and color you've got currently selected. If you like, you can move your original path to an empty spot, play a little bit with your brush size, and stroke again to see what different line thicknesses look like. Here are a couple for your perusal:

fig. 4: Stroked Paths
There you go! One last thing: you can access your paths in the Paths tab, which lives just to the right of the Layers tab (usually at the lower-right corner of your workspace). Here, you can make new paths and modify old ones. To hide your paths, just click in the empty space at the bottom of the Paths tab.

fig. 5: The Paths Tab
Let me know if you have any questions. I know I'm not using the right words for stuff, but hopefully this is a decent jumping-off point.
Happy ballooning! Also, thanks to Jason Brubaker for suggesting this topic (check out his comic-in-progress -- it's really good).
P.S. I'm almost done with page 17. Since I'm embargoing myself, here's a concept I did for the last game I worked on (click to enlarge).

UPDATE: In response to this post, talented artist Stefan Grambart has put together a detailed word balloon tutorial that's MUCH more sophisticated and ultimately more flexible than what is described above. I highly recommend checking it out, and take a look at some of his amazing art while you're there!

Nate!
ReplyDeleteI used to create word balloons like this, but I found a little addition that makes the process even more efficient... lemme send you an email and you can check it out for yourself!
Hey, I've been following this blog for a while, and you've been putting out some pretty awesome work so I thought I'd chime in.
ReplyDeleteThat's from Demigod, right? I've never played the game, but big walking castle-giants are pretty awesome. Reminds me Shadow of the Colossus (this is a good thing). I love the chaotic battle going on under his feet too :).
Also, its a little thing but you can stroke a selected path by going to the brush tool and hitting "enter". But good advice, I'll probably use this in my comics in the future. Sure beats fighting with ovals.
Ha! You worked on Demigod! That's awesome.
ReplyDeleteBut tsk tsk! You're using CS3! :P
Hey, Nate! Good to see some new brain food from you!
ReplyDeleteI use paths on rare occasion.
What I've been doing on Bonnie Lass is using the shape tools (ellipse, rounded rectangle, rectangle) with the first set of options set to Fill Pixels (instead of making paths or path layers) so I instantly get to see if I like the general shape of the balloon.
I use the regular pen tool to make the tails, so I can make some of them straight and others curved or whispy—then use the fill path tool.
From there I set a layer effect of Stroke to the whole layer, with a thickness of 5px (300dpi, looks fine to me) and set to the Inside so that the points on the tail stay sharp.
Then, if there's ever any more tweaking I want to do to the layer, I can simply take a hard-edged brush around the perimeter of the balloon if I feel like making it a little more organic (which I hardly ever do on Bonnie Lass, but it's there) or just continue to alter the shapes with the shape tools.
The reason I find this method so rewarding is that once I've got down the basic layout of the balloons, any further editing I do will intuitively apply the stroke around the edges for me, AS I make the alterations. All you have to worry about is the area of the balloons—Photoshop takes care of perimeter.
Don't know if that sounds enticing to you at all, but I thought I'd share another possible way to go with you. Minus the time it takes me to place the actual text where I want it on the page, the work on the balloons usually only takes me about 20-30 minutes per page, just depending on if I've got any other fancy things I'm trying to with them.
May I just point out off-the-topic-ally how thoroughly your posted illustration kicks ass?
ReplyDeleteHey Nate. I totally appreciate you making this little tutorial. I was meaning to comment back after you comment to me after commenting to you. (wow, that sounded lame)
ReplyDeleteI was also thinking of making a word balloon tutorial this week. Now I don't need to do as much because I can just link to this post. haha. I have a new approach that I've been finding very enjoyable. I haven't been able to do the paths thing very well because I didn't know all the alt keys you mentioned. Now I'll have to try again and see if I can make it work.
Once again, I really appreciate you mentioning my GN with a link!!!
Do you have any idea of a time frame that we will be able to pick up your first book? Looking forward to it!
hauhauahau
ReplyDeleteLets path them all
HUgss!!
** im Back for sure but i`m working for hard in pointillism**
Ripsey - Stefan, your email was AWESOME. Is there a handy link you can post here so others can see the tutorial you sent me? Your way of doing things makes mine look pretty trogloditic. Also, your blog is great, and your art is also great. I'm sort of flabbergasted by your range -- everything from superhero stuff to New Yorker-y illustration. Thanks for helping us out here!
ReplyDeletefaxmaster - Thanks for the handy pointer! I'm so bad at memorizing macros. But this one, I think, would be worth remembering. In addition, your comics are spectacular and you are hugely talented and now I will stalk you through your blog. Oh, and yes -- I love Shadow of the Colossus and it was a big influence on Demigod.
Eagle - Dude, you're giving me Photoshop envy. What, like everybody has the money to upgrade every time a new version comes out? Hey everybody, look at Moneybags McGee over here, doing his money dance in his money pants! Also, you've heard of Demigod? Huh. I thought it was pretty obscure.
Michael - This is great. I've learned more from this post than from any other post since the flatting tutorial. I've found that the best way to learn how to do something well is to offer bad advice publicly. Then all the smart people jump in with corrections. You rock. Also, Bonnie Lass is insanely good. You are an insane person. Insanely good.
murat - Hey, thanks! I'm happy you like it. It's actually pretty hard to make a bad drawing of a walking castle. It sort of makes its own gravy, you know?
ReplyDeleteJason - No problem! I'm still trying to figure out how to link to your new blog. Blogger is kinda crappy, isn't it? Maybe I should do what everybody else does and migrate to WordPress. No time for that right now, but maybe after the first issue is out? Your comic has been looking great lately. What's your timeline look like? As for mine -- with the blessing, I should be done with the linework sometime in April. Then I'll color like mad. I really want to have something done by the time San Diego rolls around (July). Ugh. We'll see.
M. Ramos - Your newest drawings are sweet, man. I love all the attention you lavish on everything. It feels so alive! As always, thanks for the hugs!
I make my living in Photoshop, I figure it's worth the money. And I saw a demo of how the tabbed windows worked. Before, I was manually arranging pages to have one take most of the space and others on the side for reference, but I'd have to keep resizing them when I tried to see the whole page at once. The tabbed windows system has saved me so much headache. But I did skip from CS2 to CS4. Never got CS3. Also, since I built this 64-bit system and was going to have a bunch of RAM, figured I may as well get a version of PS that could take full advantage. Turns out, I've ended up spending more time in the 32-bit version because the 64-bit one is a little wonky. Inverts the selection when I run my action to put bitmapped lineart into a channel and you can't run either of the BPelt filters.
ReplyDeleteAnd before I built this system, I was working on a cheap-ass laptop that I got out of desperation a couple years ago when my four-year-old desktop caught fire.
Pre-release, Demigod seemed like a bit of a big deal, but I didn't have a computer that could run it, so I never got a chance to play. There seemed to be a lot of hype for it on GameTrailers.
Don't I remember you saying something about having a Cintiq at some point? :P
Nate - Ok man, I followed your tutorial this morning to see if I can figure it out this time and everything goes smoothly until I try to right-click my finished path to "Stroke Path". For whatever reason it never gives me that option. I can see it but it's light gray and wont let me do it. This has been my problem since the beginning.
ReplyDeleteI'm using CS3 as well so it should function the same way yours does. Is there something else that I need to have turned on like the "make the stroke paths work" button. No one else seems to have this problem. I'm so alone.
All the other hints you gave work great. It's just this one part I can't do for some reason.
As far as my release schedule, I'm shooting to get all 130 pages (Volume 1) finished by the end of this year. I'm going to try to make it to the San Diego con this year(2010) to put my name on the waiting list of Small Press tables for next year(2011). I was thinking of printing up some copies of the first chapter for this year if I can find a buddy to let me sit at there booth for a bit.
So in other words, reMIND Vol 1 should be finished and printed by the middle of 2011 if all goes well. Man, that's a long way off.
Oh yeah, And I think it would be smart to switch over to Wordpress when you start pushing your second book online. Stick with Blogger for now though, I think it has served you well and it is extremely easy to update and keep running.
ReplyDeleteWordpress will definitely take a bit more time to set up and get running the way you want so hold off until you have the time.
This may be useful: http://nobbynoblittlun.deviantart.com/art/Tute-Inkscape-Word-Balloons-155983421
ReplyDeleteAwwww, Thanks Nate!
ReplyDeleteFirst off: I'll post that balloon tutorial somewhere today at lunch and email you think :)
I'm glad you liked the tutorial, I hope it was easy to follow - I had to look up the names of some of the tools, rather than refer to them as "two little boxes that glob together", etc. I actually went through about a half-dozen different ways of building balloons (and page templates for that matter), and worked exactly as you described for a long time. I only recently discovered how much easier it was to use the Add To Path method!
And again... thanks!
I'm glad you like my blog/illustrations. The range of style comes from having a background in animation - I worked on a lot of different styles on a lot of different projects. It's both a blessing and a curse though - I'd love nothing more than to lock down a signature style and become super-proficient at it!
Any ways, the feeling is mutual Nate - I really dig the artwork in Waldo :)
Eagle - Good point about my Cintiq -- though it's connected to a major POS computer. To be honest, I'm kind of surprised it even works with this Commodore 64.
ReplyDeleteJason - Did you ever sort out the stroke issue? I wasn't able to replicate the ghosted option on my end. You have the paths tab open and the path selected... have you tried right-clicking on the path entry under the tab? There should be a stroke option there, as well. I assume you don't have some other area of the drawing currently lassoed? I'd hit ctrl-D just to be sure you don't have a weird area selected. And you're sure you're on an unlocked layer? That's all I can think of for now... You know, it might be worth trying out one of the other methods described in the comments -- many of them sound better than what I described, anyway. As for switching over to Wordpress, I don't really have mental bandwidth for that right now, anyway. But someday, maybe when I set up an official site for my book (just reserved the url)!
Nobbybob - Your tutorial is just the thing -- I'd completely forgotten about the Union option! Thanks!
Ripsey - I've added a link to your tutorial on the main blog entry -- thank you so much for taking the time to explain your process in detail. It's definitely a big step forward. And as I said before, I love your work, too. Keep on truckin'!
Hahahaha.
ReplyDeleteHere's another blog that may interest you. "Todd Klein on lettering, life, literature and more":
ReplyDeletehttp://kleinletters.com/Blog/
This is his category of all posts relating specifically to lettering:
http://kleinletters.com/Blog/?cat=35
Not long ago, he PANTONE-matched his cats. >_>
Hi Nate, great article! I always enjoy seeing how different artists approach the same problem, and what could be more universal than the humble speech bubble?
ReplyDeleteYour method would work fine for me -- I'm still using CS2! -- but I've also been experimenting with new ways to visualize speech, like changing the opacity of the bubble and having it interact with the environment.
This is mostly thanks to Scott McCloud, who got me fired up with a great section about lettering in his "Making Comics" book. (Check it if you haven't already. Obviously you know how to make comics, but this is more about the Why than the How and therefore much more useful.) He touched on Eisner's ideas about how to represent what you're never supposed to see, and why the artist's choices influence the reader -- an interesting read about something I only thought I understood.
On the subject of Path, I just discovered something last night I thought I'd share with you, in case it's new to you as well...
ReplyDeleteYou can make Photoshop simulate pressure sensitivity when stroking a path. You just right-click on the path in the Paths tab, and select "Stroke..." (the ellipsis being the key here) and rather than instantly applying the stroke, you are presented a few options——specifically, what kind of tool to trace the path with via a dropdown box, and a checkbox to simulate pen pressure.
Basically, it tapers your lines for you, instead of leaving everything uniform, based on your pressure settings in the Brushes pallet. It's really put Paths into a better light for me, though I haven't actually used it for anything practical yet.
The one thing that would make it better is if there were some way to adjust the scale at which it applies the "pressured" strokes. As it is, it's always graduated the same from line to line: minimum diameter>>full size>>minimum diameter. I haven't found a way to choose how wide the brush starts within that range, or whether or not it can only taper one way, or whether it can be inversed (full>>min.>>full).
I bet this would actually look pretty cool on word balloons if tweaked just right. Just a little handy tip I found for paths in general...
Eagle - Thanks for the links, man! Reading Todd Klein makes me super self-conscious about the crappy lettering in Project Waldo. It's just astonishing that somebody could write a (very long) blog post about breath marks in comics! This is a man who really, really, really cares. Great stuff!
ReplyDeleteVarcolaroux - I've been wondering about non-opaque word balloons, myself. I'd love to see some examples of the experiments you've been doing. I felt the same inspiration while reading Making Comics (it was the first time I'd heard of a Cintiq), but it sounds like you took his suggestions more to heart. Please post some links if you get a chance!
Michael - Yeah, I tinkered with the tapering a bit, but I couldn't figure out how to make it feel organic. It's definitely a more dynamic look, but it's also quite mechanical-feeling. If you figure out how to add variation, please share. I'd love to give it another shot! (PS. Your comic is the best. Make more, please.)
Thanks, Nate! I'm trying to keep the production blog going while I work on finishing chapters 2 and 3. As I move into more of the digital phases, I'd like to start posting more of the visual progress as well... =)
ReplyDeleteIf there's nothing in the current versions of Photoshop to make the Path strokes more organic, there needs to be. Windows 7? Not my idea, since I'm on a Mac. Photoshop CS5? Hopefully my idea. haha
Michael - The Bonnie Lass process images completely blow my mind. I have no idea how you jump from roughs straight to inks without going through gallons of Whiteout. Color me even more impressed than I already was. You must have some laser focus.
ReplyDeleteDo you ever use the path tool for your line art?
ReplyDeleteAre You Looking for SEO Services in Delhi
ReplyDelete? Jeewangarg, the best SEO Company in Delhi can assist you to attain the top rankings, more conversions, and ultimately more sales.
Buy Fulvenat 250mg Injection with Emedkit
ReplyDeleteat very affordable prices. Fulvenat 250mg Injection is an estrogen blocker. It is used in the treatment of breast cancer in women who have gone through menopause. If you have any questions regarding Fulvenat (Fulvestrant), please email info@emedkit.in or call on +91 9811604429 for further details.
Thanks for the cognitive information, keep on!
ReplyDeletePlastic Surgeon in Meerut
ENT Doctor in Meerut
CBSE School in Ghaziabad
CBSE Affiliated School in Ghaziabad
Sinusitis Surgery in Meerut
Best Digital Marketing Company in Meerut
Lav Saini
Choose our professional writers and leave all your tensions of researching critical college assignments on our shoulders! GoAssignmentHelp.com.au are equipped with a vast team of professionals and knowledgeable topics tutors and experienced who make sure that you will get the Assignment Help Australia you deserve for. We have service team who are available 24 x 7. You can send your questions through email, chat, or send a Whatsapp message. We will provide you quick response to every question about your Assignment Help Melbourne related. If you need help with your documents, why not give our professional service a try today? Don’t waste your precious time. GoAssignmentHelp.com.au know that your time value. Call us now and get best Finance, Accounting, Business Law, Computer Science, Statistics, Management, Engineering many topic related Assignment Help Brisbane service.
ReplyDeleteMahipalpur escorts is now familiar with all type of clients. We offred so many deals from many years. Choose your favourate girl and get the real fun of life for you.
ReplyDeleteThis is Great Article. You are post informatics blog so keep posting.
ReplyDeleteWebsite Design in Meerut
Professional SEO company in Meerut
Top 10 CBSE Schools in Meerut
King Satta Result
Website Design Company Meerut
Satta King Live Number
Meerut News Update
On and off Business Account on Instagram
Home Services Dial Karo App
Top CBSE Schools Meerut
Your cognitive information is appreciated, keep it up!
ReplyDeleteTop Web Design Company Near Me
Plastic Surgeon in Meerut
ENT Doctor in Meerut
CBSE School in Ghaziabad
CBSE Affiliated School in Ghaziabad
Sinusitis Surgery in Meerut
Best Digital Marketing Company in Meerut
Top 6 best comedy web series in Hindi
transfer of property in london
Best solicitor in London
I found so many exciting matters in this particular content, I would like to request please keep posting such informative content. Check out free eyeglasses free shipping
ReplyDeletePretty! This has been an awesome and outstanding post. Many thanks for supplying these info. Love Message for Him
ReplyDeleteThis blog is an amazing blog, the contents here are always very educative and useful, the reason I make it my regular blog of visit so as to widen my knowledge every day, thanks for always sharing useful and interesting information, you can checkout this, it can be useful to you as well sweet romantic love good morning message for her
ReplyDeleteDear admin, You know that what you sharing here? I am constantly surprised by the amount of information accessible on this topic. What you presented was well researched and best of best written to get your stand on this over to all your content readers. Thanks a lot my dear friend for sharing like this information with me and, Please sharing more updates like this. homework help cpm - college essay help - homework help math - help with assignment
ReplyDeleteThe ISO 9001 certification is a management system standard that provides guidelines for designing and implementing an effective quality assurance process. ISO 9001 Certification help companies improve their business process efficiency and produce more reliable goods & services with higher customer satisfaction. Call @ +91 99625 90571
ReplyDeleteISO 22000 is an international standard for Food Safety Management System (FSMS). This standard specifies requirements to ensure food safety and provide high quality, safe food that meets customer requirements. Visit iso 22000 certification in spain
ReplyDeleteCall IT Expert strives to go above and beyond for its clients by providing high-quality technical and non-technical services. It goes above and beyond to assist customers in resolving all issues so that they are not bothered by any issues. If a customer has an IT-related problem while receiving services, it immediately assists the customer and helps to resolve the problem. Dial Call IT Expert Contact Number UK: +44 7480 728351 for assistance with your problems. We are a third-party service provider. Call IT Expert offers comprehensive assistance to its clients in resolving all of their email, computer, and printer problems.
ReplyDeleteGlobal Assignment Expert is an online platform that offers interactive Learning opportunities with customized solutions for students. There are various reasons for choosing Global Assignment Help services such as 24/7 availability. secured payment process, best writers, quality assignments, and so on. Are you still in doubt? Then don’t worry, visit our official website and place your order for the best grades in your assignments.
ReplyDelete
ReplyDeleteHello, I am Catherine, an academic writer at a global assignment expert. If you are looking for an experienced assignment writer with accuracy. Here we are global assignment help, and our job is to deliver assignment as per our customer requirement. Our team of experts will help you in all possible ways to complete your assignment with ease and accuracy. An Assignment expert is known for their delivering assignment on time. Our team is highly qualified and having knowledge related to all subjects. If you are an engineering student, economics student, or from another field, we are accessible for all types of assignment solutions. So connect with us today for more details.
This post offers a great overview of the complexities involved in operations management. As a student, I used to find topics like supply chain logistics, inventory control, and production planning quite challenging. Getting operations management assignment help really made a difference in how I understood and applied these concepts. It’s not just about completing assignments but actually learning how businesses operate efficiently. Appreciate the clarity and depth your blog adds to this subject
ReplyDelete“Paths of Glory” is a powerful and thought-provoking exploration of the futility of war and the complexity of human morality. The narrative, combined with impactful performances and direction, leaves a lasting impression. For students analyzing such deep themes in academic projects, seeking expert Database Assignment Help can ease the workload while ensuring insightful and high-quality submissions.
ReplyDeleteWell written article! I like the key areas and important things you raise and explain all the necessary points in this post which is easily understandable for those readers who are learning about it for the first time. visit here. A Level Tuition Online
ReplyDelete