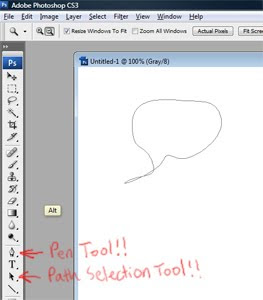
Word balloons seem so simple in the beginning. The first time you make one in Photoshop, you just draw an oval with the Elliptical Marquee Tool. After a while, the symmetry starts to bug you, so you decide to draw your word balloons by hand with the Brush Tool. Really, really slowly. But they still look kinda crappy. Before long, word balloons have become a source of sadness in your life.
Well, there's a third path. That path is Paths.
Why are paths so good for word balloons? Three reasons. First, you get super-clean, super-even lines. Second, you can modify them (if you change the words -- which you will -- it's no big deal to modify the dimensions of an already-placed balloon). Third, they're reusable. You can save all your paths into a single file and use them in future pages.
Here's how you do it (more accurately, here's how I do it, and I probably do it oddly, so please feel free to offer your own techniques in the comments section):
First, let's make a path that's shaped like a word balloon. Start by selecting the Pen Tool. The icon looks like a little pen nib.
The Pen Tool makes points, then connects them to other points to create paths. It's important to note that a path is not actually part of the image -- it's sort of a mathematical template that lives in the world of Paths. Think of Pathland as a parallel universe, full of ideal Platonic forms that can be scaled to any size and then copied into the static, pixelated world of Layerland.
To make a path with the pen tool, just left-click and drag. When you drag, you'll see little handles sprout from the point you've just made (if you don't drag, you'll just get a point without handles). These handles allow you to bend the paths between points. When you click and drag your second point, you'll see a path connecting the two points. Each new point you place will extend your path. Right out of the gate, you can make a rough word balloon shape -- don't worry about how funky it looks right now. We'll fix all that in a second. When you finally return to your starting point, your path is complete!

fig. 1: Starting Out
Now we want to adjust our points and handles. To do this, choose the Path Selection Tool. Now left click on an existing point to select it. You may find that all of the points in your path have been selected at once -- just hold down ctrl and click your point again to select only that point (ctrl toggles the Path Selection Tool between point mode and path mode). Now click and drag the little handles to see how they change the shape of your balloon. Also, if you want to either add or remove points from your path, click on your path with the Pen Tool (my biggest problem early on was a tendency to start out with too many points -- the fewer you use, the smoother your path will be).
Note how moving one handle automatically moves its opposite counterpart, like a see-saw. You want this for smooth curves, but for the sharper turns, you need to be able to move the handles independently of one another. To do this, hold down the alt key while dragging on a handle. Now that handle's free as a bird! Do this to get the sharp angles around the word balloon's tail (is "tail" the accepted term for the pointy bit? Maybe "beak" is better).


fig. 2A: The See-Saw

fig. 2B: Free as a Bird!
Fiddle with the handles a bit, and you should end up with something like this:

fig. 3: A Completed Path
Once you've gotten things adjusted the way you want, you're ready to stamp your shape into Layerland. With the Path Selection Tool selected, right-click your path. Choose Stroke Subpath, and WHAMMO! You've got yourself a word balloon! When you stroke a path, Photoshop applies whatever brush size and color you've got currently selected. If you like, you can move your original path to an empty spot, play a little bit with your brush size, and stroke again to see what different line thicknesses look like. Here are a couple for your perusal:

fig. 4: Stroked Paths
There you go! One last thing: you can access your paths in the Paths tab, which lives just to the right of the Layers tab (usually at the lower-right corner of your workspace). Here, you can make new paths and modify old ones. To hide your paths, just click in the empty space at the bottom of the Paths tab.

fig. 5: The Paths Tab
Let me know if you have any questions. I know I'm not using the right words for stuff, but hopefully this is a decent jumping-off point.
Happy ballooning! Also, thanks to Jason Brubaker for suggesting this topic (check out his comic-in-progress -- it's really good).
P.S. I'm almost done with page 17. Since I'm embargoing myself, here's a concept I did for the last game I worked on (click to enlarge).

UPDATE: In response to this post, talented artist Stefan Grambart has put together a detailed word balloon tutorial that's MUCH more sophisticated and ultimately more flexible than what is described above. I highly recommend checking it out, and take a look at some of his amazing art while you're there!